Orfeo: the new standard in oboe by Buffet Crampon

Orfeo comes to us out of a collaboration between the Buffet Crampon Research and Development team and a group comprising testers, masters and soloists from renowned international orchestras. It is the fruit of labour of a distinguished team, demanding five years of research to attain the level of excellence that was their goal.

Its entire register creates a sensation of excitement with incomparable low tones, consistent over the whole range, and wonderfully easy flow.

Orfeo unites modern materials of utmost reliability with the handcrafted, traditional quality of its manufacture. Without question, the Green LinE material has been used to its maximum technical capacities.

Call us to discuss pricing, availability, and to set up a trial at 1-800-926-5587. Or, browse Buffet Crampon oboes in our online store.

Pitch:
440/443 Hz

Body:
Green LinE
Black tip rings
tenons and sockets metal-0lined
tenon caps

Keywork:
French conservatory system
3 octave keys, semi-0automatic
left hand F lever
highly reliable keywork, silver-plated nickel silver
gold-plated keywork optional
adjustable thumb rest (new design)
thumb plate keys may be added

Case:
High Tech metallic silver and black leather


Repair Tips: Tight Tenons

This summer has been exceptionally humid, especially in the upper Midwest, which leads to the swelling of wood. If you play oboe, bassoon, clarinet, or other wooden instrument, you may be experiencing tight tenons (where the joints fit together). If your tenons reveal slight friction when assembling your instrument, but come apart when you are finished playing, then just wait out the summer; the tenon/socket fit will get better in a month or two. It is best to not remove material if possible because the tenon will be loose in the Fall after the humidity decreases, and with oboes and clarinets this can mis-adjust the bridge mechanism. However, if your tenons are so tight that force is needed to assemble and disassemble your instrument, bring it in and we will turn down the wood to a proper fit. Do not force the instrument or you can risk bending the keys!

Repair Tips: Stuck Swab

Remember to swab out your oboe after every playing session! Always check a pull-through swab for knots before sending through the instrument. The slightest knot in the silk or string can be enough to get the swab stuck near the crown (inside the top of the oboe). If a swab seems to be stuck, but the tail string is still showing out the bottom of the top joint, you can pull on the tail string (with MINIMAL force) to retrieve the swab from your oboe.  However, if your swab does get stuck with no string visible to pull back through the bore, bring it in to us or another qualified repair technician for proper removal. Do not attempt to remove a stuck swab on your own at home! Midwest Musical Imports offers stuck-swab removal at no charge.

Repair Tips: Plastic Instruments and Cork Grease

 "If your oboe or clarinet is plastic, I would recommend using paraffin wax instead of cork grease.  Cork grease makes it difficult to line up the bridge keys between the joints because it increases the friction between the cork/plastic relationship, whereas paraffin wax creates a smooth, “gliding” between the cork and plastic sockets.  It seems logical that if there is tenon/cork tightness, then more cork grease should be applied; however, it is possible to over-apply cork grease, which will only make things worse.  Excessively applied cork grease is messy and can deteriorate the bond of glue holding the cork to the plastic tenon, as well as the glue bond on the surrounding key corks.  Applying paraffin will protect this glue bond, and can be purchased inexpensively at any grocery or convenience store.  If you do not have paraffin, cork grease is better than nothing at all."  --Eric Anderson

Bassoon Keywork Options

The bassoon, possibly more than any other instrument, has a huge selection of possible key options.  Determining the differences between some similar keys, or if you need a particular option, can be a daunting task.  Here I will attempt to break down the most popular options for Heckel and Fox bassoons.  Some keys conflict with others either due to the placement of the key itself or associated levers or in the way that the hole must be drilled.  Please don't hesitate to call Midwest Musical Imports and ask for a bassoon specialist to discuss any of the options.  This list is not comprehensive!

High D key – This is an expected standard key for a modern intermediate or professional bassoon.  Useful for flicking and to hit notes from C5 and up.

High E key – also known as a G trill key.  Facilitates F3-G3 trill, and to play high E.  Typically this is positioned above the 1st finger on the left hand.  It can also be placed “above” the Eb key between the 1st and 2nd finger.

Plateau key for third finger left hand – This is an option usually reserved for student instruments, as it shortens the reach between the 2nd and 3rd fingers of the left hand, but can hamper the tone or intonation of some notes.  The “normal” configuration of this is the Third Finger Ring Key.

"Crown” style pancake key – This option changes the shape of the low E key (or “Pancake” key) from a totally round shape to a more square shape, which can facilitate the movement from the Bb key or the F# key to the E key.  This can be done on only one side of the key if requested (but this is quite rare).

Rollers – Rollers can be placed on just about any key.  Typically they are placed in pairs between adjacent keys, but this does not need to be the case.  Besides the standard four rollers for the two pinky keys, popular places for rollers are:

  • On any combination of keys for the right thumb (except for any Ab/Bb trill key)
  • On the front F# key (especially when the Double Wide F# key is requested)
  • On Low C and D
  • On the Whisper key and C# keys

A-Whisper Bridge – A very simple mechanism that links the “A” key (for the left thumb) with the whisper key.  This helps the pitch and stability and response of A4 and Bb4.

Whisper Locks – There are many different kinds of whisper lock mechanisms.  Either the left or right thumb operates the mechanism to keep the whisper key closed.  Please ask for details on the different kinds of locks offered.

Double Wide F# key – This option extends the from F# key across both the F and Ab keys, allowing for easier movement between all of those keys.

Offset Eb/E keys – This option takes the Eb and high E keys and shifts them down the instrument so that they Eb key is between the 2nd and 3rd fingers of the left hand, and the E key is between the 1st and 2nd finger.

High F key – Like the high E key, to facilitate a simple fingering for high F.  There are several positions this key can be placed in over the left hand, depending on how the high E key is configured.

Eb Trill key – This is used to facilitate the trill from D3-Eb3.  This can be placed either between the 2nd and 3rd finger on the left hand (the 3rd finger trills the key) or on the boot joint above the 1st finger of the right hand (the 1st finger trills the key).  Depending on which version is selected, other keys may need to be moved from their typical locations.

Ab/Bb Trill – There are several ways in which an Ab2-Bb2 trill can be accomplished on the bassoon.  Most commonly a key is placed on the boot above the back F# and G# keys for the right thumb.  The technical way in which the mechanism works varies from manufacturer to manufacturer, but the player plays Ab, and trills the added key.  There is an “Articulated” mechanism for this trill as well, in which the fingerings for Ab is used with an added key and the 3rd finger of the right hand accomplishes the trill (as if playing G-A, this becomes G#-A#).  This articulated variety is quite uncommon.

Extra low C key – This is simply an added touch for low C positioned to the right (from the perspective of the player) of the low D key.  This adds more fluid motion from lowest C-Bb without having to leverage the thumb over the low B key.

Pinky, or “French” whisper key – This is a mechanism to close the whisper key with the left hand 4th finger, placed near the low Db/C# key.

A Ring Key – The ring key standard on all modern bassoons for the 3rd finger of the right hand allows for the proper pitch of G4 by opening a second tone hole automatically.  A second ring for the 1st finger of the right hand can allow an extra tone hole to open above the 1st finger to open automatically.  This allows for Ab4 and A4 to be played with the low F key (4th finger right hand) instead of the need for the G key (3rd finger right hand) while maintaining proper pitch.  The mechanism is automatic and allows for easier technique in the upper register.  Many players still prefer the tone color of the 3rd finger version, and this option does not prevent that fingering.

Db-Eb (C#-D#) mechanisms – These are mechanisms that allow for easier movement between the lowest Db and Eb on the bassoon.  The simplest mechanism is an extra touch for the left thumb that operates the Db key, freeing up the 4th finger left hand to trill the Eb key.  This is only useful for a normally impossible trill.  There are many ways Heckel and Fox can accomplish this particular task, so please ask us which one might be right for you.  The more complicated “Articulated” mechanisms allow for one key to be used for both the low Db and low Eb, so the movement between the two notes is accomplished by just the movement of the thumb from the low C to D keys; the 4th finger does not need to move.  Again, there are several ways in which this can be accomplished.  The least common way this is accomplished is with an extra touch for low Eb for the left thumb, near the D key.

Gentleman's” Model, or Divided Long Joint – This option positions the split between the long joint and the bell equal to the top of the wing joint.  This means that the bell, long joint and wing joint are more similar in length, so the case for the bassoon can be made more square.

Heckel Bocal Information

Heckel Bassoon Bocal Information

Changing bocals can make a dramatic difference on any bassoon.  Many acoustic problems can be minimized or solved with the correct type of bocal.  Heckel is one of the lead suppliers of bassoon bocals in the world.  They offer many different types to suit each player's style and set-up. (Click here for information on Puchner bocals)

Here is a "cheat sheet" of the primary characteristics of the bocals we typically stock:

C – “hard” German Silver alloy (“Z” alloy)

  • More high partials in the sound.

CC – “soft” German Silver alloy (“N” alloy)

  • More balanced set of partials in the sound
  • More blending and “warmer”

D – indicates Thin Wall construction - .5mm average thickness instead of .6mm

  • More immediate response, especially in the lower register.
  • Less stable with softer reeds
  • More vibrant sound

Vdifferently tapered bore version of the C bore

  • Adjusts intonation across range of instrument
  • Especially well suited to older bore designs
  • Tends to raise pitch of tenor register

XLlarger bore version of primary bore

  • Heckel’s modern version of the pre-war bocal bore
  • Excellent on Fox bassoons, especially Renards!
  • Specifically designed for <8000 series Heckels

R – new process for forming metal

  • Non-traditional brand and type stamping (below cork)
  • More compressed metal promotes properties of harder alloys

Silver or Nickel Plating

  • Silver (softer) or Nickel (harder) promotes the qualities associated with the softer or harder base metal types

Length

  • 1:  A=442            (roughly equal to Fox #2 length)
  • 2:  A=440            (roughly equal to Fox #3 length)

Still want more information?

If you still want more information, this is our "old" guide with more info on the types we carry, and on the other options available from Heckel.

Below is a rough guideline in choosing the correct bocal.  Bocal compatibility depends on many factors—reed type, instrument, the way an individual blows air into the horn, and the musician's overall individuality.

BASE METAL

Most of our Heckel bocals are made of the German Silver (soft and hard). Other base metals can be special ordered upon request.  The labeling of the base metal is located directly above the cork.

Base Metal Sound Quality Labeling above the cork
German Silver, soft Standard Type N*
German Silver, hard Harder Sound than the soft German Silver Z**
Gold Brass Mellow and quiet sound for chamber music G
Sterling Silver 925 Bright and quiet sound AG
Gold 8 Karat (333) Mellow but direct sound AU
Gold 14 Karat (585) Noticeably mellower sound 14kt
Gold 18 Karat (750) Similar to the 14kt but even more mellow 18kt
Palladium Hard sound PD***

*Usually used with all thick wall bocals except the C type

**Usually used with all thin wall bocals and the C (thick wall) bocals

***Developed for people with allergies to the German silver alloy

WALL THICKNESS

All Heckel bocals are available in two thicknesses:  0.6mm (thick wall) and 0.5mm (thin wall).  All of the thin wall bocals will be labeled with the letter “D” as the second letter and thick wall bocals will have the letter “C”.  Thin wall bocals tend to have a richer sound, good response, and more flexibility, but are not as stable as the thick wall bocals.  They are usually made of the hard German Silver (Z).  The thick wall bocals are usually made of the soft German Silver (N).

A standard bocal with the CC bore is made of soft German Silver (N).  The standard bocal with the C bore is made of hard German Silver (Z).  Thus, the only difference between the C and CC bocals is the type of base metal.

Thick wall

Thin Wall

Properties 
C, CC CD Standard type for new Heckel bassoonsWell balanced intonation, good response
CE, CCE CDE Narrower tip opening
VC, VCC VCD Good high register, balances intonation problems in the middle range.  Works particularly well with older Heckel bassoons.
VCE, VCCE VCDE Combination of V and E types
B BD Very light and responsive high register, less stable in the middle register
BB BBD Light and responsive high register, less stable in the middle register

LENGTHS

Heckel bocals are available in different lengths to manipulate the overall tuning.  We typically carry lengths 1 and 2, but others can be special ordered upon request.

00

0

1

2

3

446 Hz

444 Hz

442 Hz

440 Hz

438 Hz

PLATINGS

We typically carry silver and nickel plated bocals, but others can be special ordered upon request.

Unplated Specific sound of the relevant base metal
Silver Plated Sweeter sound
Nickel Plated Brighter sound
Gold Plated Increased stability with gold brass bocals

R BOCALS

All Heckel bocals are available in R types.  With R bocals, the metal is compressed more strongly and evenly.  This leads to a better response and a wider sound spectrum.  R bocals have no visible stamp on the tube portion of the bocal, they are labeled exclusively on the visible strip of metal on the end of the tube below the cork.

XL BOCALS

XL bocals are specially designed to be compatible with Pre-War design bassoon, and improve response and resonance in the higher register.  They can come in any type, but we typically only carry CC-XL and CD-XL bocals.

BENDS

All bocals are made with the traditional S bend.  Flat bends (British bend) and custom bends are available upon request.  We only carry the S bend Heckel bocals, but can special order any other bend upon request. Contact MMI for help selecting and ordering a bocal.

Cane Processing Overview

Oboe Tube Cane Processing Guide

Reed-making is a lifetime process for any oboist out there, and when it comes time to start processing your own cane, it can almost double the workload! Whether you're a professional processing your own cane for yourself and/or students or you're an aspiring oboist learning your way around cane processing, we would like to provide some basic information you may find useful along the way. Remember, there is no 'right' way to process cane and everyone does things differently. These guidelines are just some things to consider and how our oboe specialists here at Midwest Musical Imports do things.

Tube Cane Selection

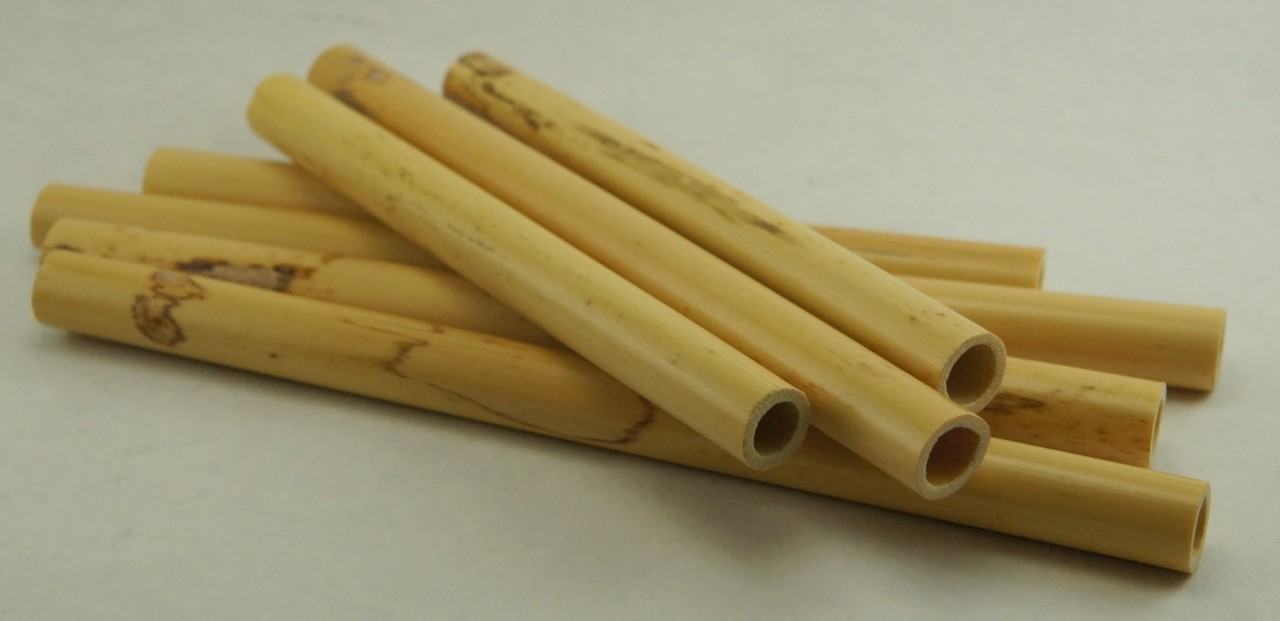
If you're new to cane processing and it's time to start from tube cane the most common questions out there are, 'How do I sort cane?", 'What's the best cane out there?' and, 'What do I look for when I'm purchasing tube cane?' The bad news is that there isn't a concrete answer to these questions as everyone does things a little differently and looks for different characteristics in their cane. However, there are a few tips that will come in handy no matter how you choose to sort tube cane in the future.

Density
Although the majority of tube cane is grown in the South of France and is the same plant (Arundo donax for you science buffs), every 'brand' of cane is going to be different. The density or 'hardness' of cane will produce different results through every step of the cane processing and reed-making processes. Harder, more dense canes will gouge and finish on the thinner side and the resulting reeds will require more scraping to vibrate, be slightly higher in pitch, and can ultimately last longer. Softer canes, ranging from soft – medium-soft, will require a thicker finishing gouge and the resulting reeds will generally require less scraping (as more cane will come off with each scrape), be slightly flat in pitch, and will have a shorter life-span. Here at MMI we offer a variety of tube cane with varying densities. Each reed-maker will develop his or her own preference for cane along the way but remember, if you have questions about tube cane our oboe specialists are always here to answer questions as well as offer any tips or opinions of their own.

Diameter
Just as with density or 'hardness,' diameter becomes a personal preference with time. If you're just starting out, it's best to take the recommendations fromyour teacher while you're learning. Environmental conditions such as humidity, temperature, and elevation also contribute to your diameter selection. Most tube cane is available in 9.5-10 millimeters, 10-10.5 millimeters, and 10.5-11 millimeter diameters which refers to the diameter of tube. The diameter is important as it will help dictate the opening of the resulting reeds. 9.5-10 millimeter cane will result in reeds that have much larger openings whereas 10.5-11 millimeter cane will result in smaller, more closed openings . There are, of course, other variables that will dictate reed openings (including staples, tie length, shape, etc.), but the foundation of the reed opening will come from the diameter. The most common used diameter is 10-10.5 mm cane, which means you can expect tubes with diameters ranging from 10.0-10.5 mm in the batch. The best way to measure your tube cane is with a radius gauge.

Straightness
When sorting tube cane, straightness is one of the most important factors to take into consideration and is more or less universal among all oboists. When sorting cane you want to seek out the straightest pieces of the batch. Once you split the tubes into their respective pieces, you want to find those that: will lay flat on a hard surface, are not warped or 'twisty', and are not bowed in any direction (either outward or inward.) Using cane that is warped or bowed or not straight in any manner will make gouging, shaping, and ultimately reed-making both frustrating and pointless. Remember, eliminate as many variables in the tube cane processing stages as you can so that when it comes to actually making the reeds you're not putting up roadblocks for yourself.

Cane coloration/grains
Not all oboists are concerned with the coloration or the 'grains' of the tube cane but there are a few things to take note of when you're looking at tube cane. First, the coloration of the cane should for the most part be golden in color, with a 'shiny' surface. Hold the cane up to a light and observe how the light is reflected off the surface. Cane that is dull in finish and green or greyish in color may either be very hard or very soft and could be troublesome to gouge or scrape on. The second thing to take note of are the grains in the cane. The grains of the cane run vertically through the tube and can range from very tightly packed together to very wide. In general, you want to select cane with grains that are straight and more packed together. Tube cane with grains that are very wide apart tend to be very fiberous (can shred very easily during gouging and scraping) and can be very difficult to work with. Remember to avoid those road-blocks early! If the cane looks like it might be difficult to work with, odds are it will be.

When selecting your tube cane for purchase, there is unfortunately no way to determine what the 'best' cane on the market will be. Most oboists will purchase tube cane based on word of mouth and what happens to be the 'hot seller' at any particular time. We suggest asking around or talking to one of our oboe specialists when it comes time to purchase your next batch of tube cane. As a general rule, it is never wise to purchase large quantities of cane you've never personally worked with. Start out with smaller quantities (here are MMI we sell our cane in ¼ lb increments) to test and then if you like what you get you can always call us and order more! Keep in mind that most dealers are constantly receiving shipments of cane and these shipments will have different 'harvest dates.' These batches will vary slightly; the cane you bought and loved 4 months ago may not be the same in a recent batch. Again, start with a smaller quantity until you know what you're working with!

Pre-Gouging Cane

Once you've selected and received your tube cane, the next steps are the foundation of building your reeds. There are several ways and devices you can use to split tube cane. Cane splitters are designed to split the tube cane into three pieces to allow you to sort out the straight and/or useable pieces. These splitters are usually designed to help reduce the risk of injury during this process. Some oboists prefer to use a single razor blade or retractable knife as it allows you to select the exact curve of that particular piece of cane you want to use. While this allows you more control of the pieces, it's also more dangerous. If you're new to cane splitting we highly recommend you work with a teacher or mentor and get their advice. Our oboists at MMI can also offer you advice in this area.

Next you'll want to guillotine and pre-gouge your cane for the gouging machine. Take note that there are a couple ways of doing this next step. Some people will not soak cane until this point, preferring to work with tube cane dry. Some people prefer to work with tube cane after it has been soaked as you will get a more accurate measurement of the diameter when the cane is fully saturated (as cane fibers swell when wet.) Either way, it is recommended that pre-gouging or planing cane should be done when the cane has been soaked. There are, of course, exceptions to this as some gouging machines (like the Innoledy machine) which allow you to gouge completely dry. This is NOT recommended for traditional style machines (such as RDG, Ross, Graf, Driscoll etc) as gouging dry cane is the fastest way to dull the blade of your or anyone's machines!

The guillotine is a machine that cuts the tube to length to be gouged. There are a few different varieties of guillotines on the market, here at MMI we sell the Ross Oboe Guillotine. Pre-gouging is the next step once the cane has been cut to length and the purpose of this is to remove a certain amount of cane and create a flat surface for the gouger blade to cut. There are two standard styles of pre-gouging machines that are generally used. The first is the 'push-through' pre-gouger in which the cane is pushed through a front-facing blade by a pusher. The second is the planing method which the cane is placed in a bed and planed using a hand held wood planer. Both of these methods are common ways to prepare cane and while there also exist pre-gougers with a turn-style crank, push pre-gougers and planers are still the standard.

Gouging Cane

At this point, it's time to gouge the prepared cane. Now, it's good to note that when you're ready to gouge to make absolutely certain your cane is thoroughly soaked. We usually recommend the cane has been in luke-warm water for at least an hour to ensure the fibers are fully saturated. Remember, gouging cane that is even remotely dry will quickly dull the blade of any gouging machine!

Gouging cane is a separate process all in itself and can quickly become the bane of an oboist's existence. There are plenty of gouging machines on the market and the only way to determine what works best for you is try cane gouged on multiple machines. If you're a student, most universities have at least one gouging machine to try. Otherwise we suggest talking to your teacher and getting recommendations as to what gouge to be using. If you're in the market for a gouging machine, it's best to ask around, gather as much information on what is out there, and most importantly TRY CANE! Every machine will yield different results and you should take the time to find what works best for YOU and not what works best for everyone else. Below is a list of standard gouging machines and their makers on the market today.

RDG Woodwinds – Robert Gilbert, Los Angeles, CA

Ross – Dan Ross, Arkansas

Graf – Robert Graf, New Jersey

Opus 1 – Robin Driscoll, Pennsylvania

Innoledy – Tong Cui, New York

The gouging process can become very elaborate and there are many oboists out there who very quickly become obsessed with measuring and adjusting their machines. In general, the most important thing about any gouge is to keep track of the measurements or thickness of the finished piece of cane. Most American oboists will look for a center thickness of .58-.61 millimeters. That is to say that after you gouge a piece of cane the center should be the thickest part and should gradually get thinner as you move outward toward the sides of the cane. The other most important measurement is the sides of the cane just where the ears would be on a shaped piece of cane. The generally accepted measurement for the sides of the cane should be between .45-.48. Keep in mind that these measurements are not concrete by any means and every oboist develops their own preference when gouging cane. While these measurements can vary from person to person, it's important to remember that this will serve as the foundation of the reed. If the gouge measurements are off then the resulting reeds will not work properly and hours of headaches will ensue!

Cane processing is an essential part of any professional or aspiring professional oboists' life. While there are numerous variables involved throughout this process we hope this overview helps shed some light on any questions that might arise. Contact the oboe specialists at MMI for help with any of your oboe and cane needs!

Repair Services

Repair Services at Midwest Musical Imports

We are pleased to offer repair services for musical instruments. Midwest Musical Imports employs two full-time repair technicians. We will do our best to turn around smaller repairs quickly.  If you have an emergency repair, please call us at (800) 926-5587 for time, cost, and availability of rush services.

For years, we have been known for specializing in double reed repair, but we want you to know that we are also equipped to handle clarinets, flutes, and saxophones. We have also set up a blog with repair and maintenance advice by both myself and Matt so you can keep your instrument in the best condition between regular servicing.

---Eric Anderson
Head Repair Technician

Services offered:

  • Maintenance of instruments including disassembly of all key work, cleaning, lubricating, and adjusting of mechanisms
  • Replacement of torn or worn pads and corks
  • Rebuilding of loose or broken tenons
  • Repair of wood rot in bassoons
  • Tone-hole repairs required due to chips and cracks
  • Repairs to keywork including modifications and fabrication of parts
  • Repairs to cracks and leaks in instruments
  • Minor bocal repairs, including recorking
  • Mechanical Overhauls (this does not include key plating or re-finishing work)

This is only a sample of the many services that we offer.  Please call for more details.

The repair shop is open on Saturdays!

This allows customers to have small "walk-in" servicing done while they wait.  These repairs will be done on a first-come first-serve basis, and the rush rate will not apply on Saturdays.  Customers with repairs that will require more extensive work will be advised to leave the instrument with us.

Repair Technicians:

Eric Anderson graduated with a degree in musical instrument repair in 2005 from Minnesota State College SE tech. He has been repairing wind instruments since, with a primary focus in Bassoon and Oboe. As a member of NAPBIRT, he continues to further the education of his career, by attending annual conferences and sharing knowledge and techniques amongst other technicians in the craft. His support of music on a local and national level is a driving factor for both his professional and personal life.

Matt Reich is a native of Milbank South Dakota and 1983 graduate of South Dakota State University with a Music Education Degree. After service in the US Army in 1987, Matt began a career in the music retail industry throughout Iowa, Missouri, Illinois, and now Minnesota. Matt graduated from Redwing Technical College (Minnesota State College Southeast Tech) with a Band Instrument Repair Diploma in 1998 and has been behind the bench turning a screwdriver ever since. Matt is a member in good standing of the National Association of Professional Band Instrument Repair Technicians (NAPBIRT).